online retailer,bulk & wholesale and OEM/ODM e-shop of motor and controller, Shenzhen weigena technology co., LTD")


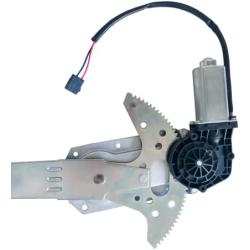
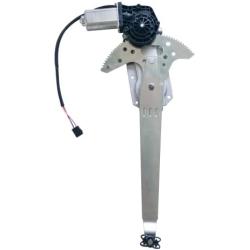
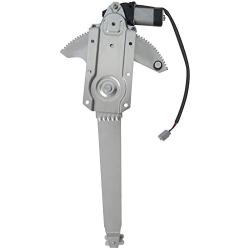
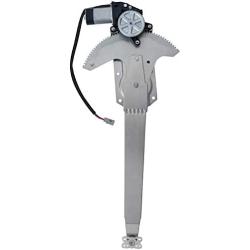
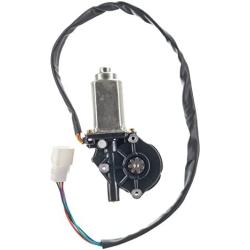
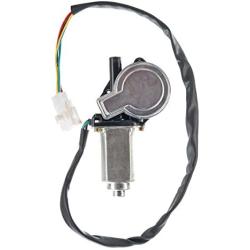
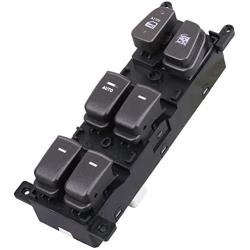
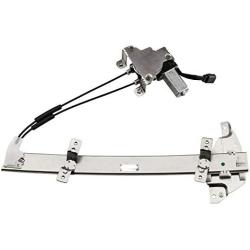
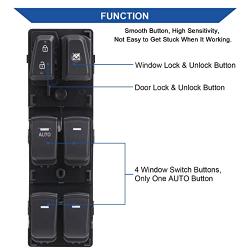
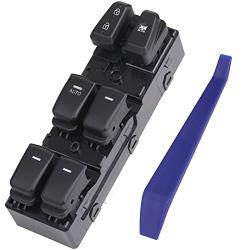
Front Left Driver Side Master Power Door Window Switch 5-Button compatible with 02-05 Excursion Explorer/04-05 Sport Trac/02-06 F250 F350 F550/04-06 F450 Super Duty Crew Cab Pickup - 02-05 Mountaineer
About this product
*Provider of Power Door Window Switch products to the worldwide OEM market and aftermarket.
*SCHNECKE offers complete Power Door Window Switch coverage for Asian, Domestic and European vehicles.
*2002-2005 Ford Excursion V10 6.8L Front Left
*2002-2005 Ford Excursion V8 5.4L Front Left
Description
Door Window Switch Applications:
Door Window Switch Applications:
Step 0: Locate the door with the damaged or faulty power window switch. Visually look at the switch for any exterior damage.
Step 0: Locate the door with the damaged or faulty power window switch
Step 1: Park your vehicle on a flat, hard surface.
Step 1: Park your vehicle on a flat, hard surfaceStep 2: Place wheel chocks around the rear tires. Engage the parking brake to lock the rear tires from moving.
Step 2: Place wheel chocks around the rear tiresStep 3: Install a nine volt battery saver into your cigarette lighter. This will keep your computer live and keep your setting current in the vehicle.
Step 3: Install a nine volt battery saver into your cigarette lighterStep 4: Open the vehicleÂ’s hood to disconnect your battery. Take the ground cable off of the batteryÂ’s negative post disabling the power to the power window switches.
Step 4: Open the vehicleÂ’s hood to disconnect your batteryStep 5: Locate the door with the faulty power window switch. Using a flat tip screwdriver, slightly pry up all around the switch base or cluster.
Pop out the switch base or cluster and remove the harness from the switch.
Step 6: Pry out the locking tabs. Using a small pocket flat tip screwdriver, slightly pry on the locking tabs on the power window switch.
Step 6: Pry out the locking tabsPull out the switch from the base or cluster. You may need to use needle nose plyers to help pull out the switch.
Step 7: Get electrical cleaner and clean out the harness. This removes any moisture and debris to create a complete connection.
Step 7: Get electrical cleaner and clean out the harnessStep 8: Pop the new power window switch into the door lock cluster. Ensure that the locking tabs snap onto the power window switch keeping it secured.
Step 8: Pop the new power window switch into the door lock clusterStep 9: Hook up the harness to the power window base or cluster. Snap the power window base or cluster into the door panel.
Step 9: Hook up the harness to the power window base or clusterYou may need to use a pocket flat tip screwdriver to help the locking tabs slide into the door panel.
Step 10: Locate the door with the faulty power window switch.
Step 10: Locate the door with the faulty power window switchStep 11: Remove the inner door handle. To do this, pry the cup-shaped plastic cover out from under the door handle.
Step 11: Remove the inner door handleThis component is separate from the plastic rim around the handle. There is a gap in the forward edge of the cup-shaped cover, so you can insert a flat screwdriver. Remove the cover, and underneath there is a cross tip head screw which must be removed. The plastic rim can then be removed from around the handle.
Step 12: Remove the panel on the inside of the door. Gently pry the panel away from the door all the way around.
Step 12: Remove the panel on the inside of the doorA flat screwdriver or a lisle door tool (preferred) helps here, but be gentle so you donÂ’t damage the painted door around the panel. Once all the clips are loose, grab the panel top and bottom and bend it slightly away from the door.
Lift the whole panel straight up to lift it clear of the catch behind the door handle. As you do this, a large coil spring will fall out. This spring sits behind the window winder handle, and itÂ’s somewhat fiddly to get back into place as you reinstall the panel.
Step 13: Pry on the locking tabs. Using a small pocket flat tip screwdriver, slightly pry on the locking tabs on the power window switch.
Step 13: Pry on the locking tabsPull out the switch from the base or cluster. You may need to use needle nose plyers to help pull out the switch.
Step 14: Get electrical cleaner and clean out the harness. This removes any moisture and debris to create a complete connection.
Step 14: Get electrical cleaner and clean out the harnessStep 15: Pop the new power window switch into the door lock cluster. Ensure that the locking tabs snap onto the power window switch, which keeps it secured.
Step 15: Pop the new power window switch into the door lock clusterStep 16: Hook up the harness to the power window base or cluster.
Step 16: Hook up the harness to the power window base or clusterStep 17: Install the door panel onto the door. Slide the door panel down and in towards the front of the car to ensure that the door handle is in place.
Step 17: Install the door panel onto the doorSnap all of the door tabs into the door securing the door panel.
If you removed the bolts or screw from the door panel, make sure that you reinstall them. Also, if you disconnected the door latch cable to remove the door panel, make sure that you reconnect the door latch cable. Finally, if you had to remove the speaker from the door panel, be sure to reinstall the speaker.
Step 18: Install the inner door handle. Install the screws to secure the door handle to the door panel.
Step 18: Install the inner door handleSnap the screw cover in place.
Step 19: Open the vehicleÂ’s hood if it is not already open. Reconnect the ground cable back onto the batteryÂ’s negative post.
Step 19: Open the vehicleÂ’s hood if it is not already openRemove the nine volt battery saver from the cigarette lighter.
Step 20: Tighten the battery clamp. Ensure that the connection is good.
Step 20: Tighten the battery clamp
Step 21: Remove the wheel chocks from the vehicle. Clean up your tools as well.
Step 21: Remove the wheel chocks from the vehicleStep 22: Check the power switch function. Turn the key to the on position and press on the up side of the switch.
Step 22: Check the power switch functionThe door window should go up with the door open or the door closed. Press the down side of the switch. The door window should go down with the door open or the door closed.
Press on the cut out switch to lock the passenger windows. Check each window to make sure they are locked. Now, press on the cut out switch to unlock the passenger windows. Check each window to make sure they operate.
If your door window does not open after replacing the power window switch, then there may be further diagnosis of the power window switch assembly needed or a possible electronic component failure. If you do not feel confident doing the job yourself, have one of YourMechanicÂ’s certified technicians perform a replacement.
Note Note Provider of Power Door Window Switch products to the worldwide OEM market and aftermarket.SCHNECKE offers complete Power Door Window Switch coverage for Asian, Domestic and European vehicles.2002-2005 Ford Excursion V10 6.8L Front Left2002-2005 Ford Excursion V8 5.4L Front Left2003-2005 Ford Excursion V8 6.0L Front Left2002-2003 Ford Excursion V8 7.3L Front Left2002-2003 Ford Explorer V6 4.0L Front Left 5-Button2004-2005 Ford Explorer V6 4.0L Front Left2002-2003 Ford Explorer V8 4.6L Front Left 5-Button2004-2005 Ford Explorer V8 4.6L Front Left2004-2005 Ford Explorer Sport Trac V6 4.0L Front Left2002-2006 Ford F-250 Super Duty V10 6.8L Front Left Crew Cab Pickup2002-2006 Ford F-250 Super Duty V8 5.4L Front Left Crew Cab Pickup2003-2006 Ford F-250 Super Duty V8 6.0L Front Left Crew Cab Pickup2002-2003 Ford F-250 Super Duty V8 7.3L Front Left Crew Cab Pickup2003-2006 Ford F-350 Super Duty V10 6.8L Front Left Crew Cab Pickup2002-2006 Ford F-350 Super Duty V8 5.4L Front Left Crew Cab Pickup2003-2006 Ford F-350 Super Duty V8 6.0L Front Left Crew Cab Pickup2002-2003 Ford F-350 Super Duty V8 7.3L Front Left Crew Cab Pickup2004-2006 Ford F-450 Super Duty V10 6.8L Front Left2004-2006 Ford F-450 Super Duty V8 6.0L Front Left2002-2006 Ford F-550 Super Duty V10 6.8L Front Left2003-2006 Ford F-550 Super Duty V8 6.0L Front Left2002-2003 Ford F-550 Super Duty V8 7.3L Front Left2002-2003 Mercury Mountaineer V6 4.0L Front Left 5-Button2004-2005 Mercury Mountaineer V6 4.0L Front Left2002-2003 Mercury Mountaineer V8 4.6L Front Left 5-Button2004-2005 Mercury Mountaineer V6 4.0L Front LeftGently press down on the switch to see if the window will go down. Gently pull up on the switch to see if the window will go up.Note: Some vehicles only operate the power windows with the key in the ignition and the tumbler turned on or in the accessories position.: Some vehicles may have bolts or torques bit screws that hold the panel secured to the door. Also, you may need to disconnect the door latch cable to remove the door panel. The speaker may need to be removed from the door panel if mounted from the outside.: If you did not have a nine volt battery saver, you will have to reset all of the settings in your vehicle, like your radio, electric seats, and electric mirrors.Frequency Asked Questions
What is motormaker.net?
MotorMaker.net is an online retailer and bulk order e-shop for electric motor and controller products, range from standard products and customized products. Main production bases are located in Shenzhen, Dongguan, Wuhan, Shanghai and Chengdu. A professional team supports your order and customization design.
What service can be supported from motormaker.net?
MotorMaker.net offer product order and product customization service. All orders will be supported after-sales service, including quanlity gurantee, and technical support.
How to order products from motormaker.net?
You can online order product from motormaker.net by adding product to cart and got to checkout page. Multiple currency options are supported. You can choose suitable currency to place order. Before checkout, you should register account to submit order information.
How to delivery your order from motormaker.net to you?
For order delivery, motormaker.net provides three shipping options, express, air-flight and sea freight. You can choose one option according to your order.
How to inquiry product bulk price?
For the interested product, you can submit bulk price inquiry by bulk order inquiry form.
Related Products